Introduction to MSI, TensorFlow, and PyTorch
Outline
Below is a short introdcution some tools used in deep learning applications. We will go over
- Connecting and running jobs at MSI
- Using custom kernels in Jupyter
- Construction of a basic neural network with TensorFlow
- Saving/Restoring models
- Basic example of PyTorch
z.umn.edu/colab-5980
Introduction to MSI
Connecting to MSI
- SSH from UMN network (including wireless and VPN)
ssh login.msi.umn.edu ssh mesabi - Jupyter (https://notebooks.msi.umn.edu/)
Storage
- Home directory ~/
- Global scratch /scratch.global
- Local scratch /scratch.local
- S3 storage (s3.msi.umn.edu)
ssh login.msi.umn.edu
s3cmd ls
s3cmd mb s3://$USER
s3cmd put some.file s3://$USER/some.file
Software
- environment modules
- used to control environment variables and prevent conflicts between the hundreds of installed software packages
module avail python
module load python/3.6.3
module unload python
- used to control environment variables and prevent conflicts between the hundreds of installed software packages
Compute Hardware

Mesabi (2015)
- Cores: 19,040 Intel Haswell
- Memory: 83 TB
- Accelerators: 80 K40 Nvidia gpGPUs
- Peak: 860 TFlops
Mangi (2019 Mesabi upgrade)
- Cores: 20,888 AMD Rome
- Memory: 56 TB
- Accelerators: 40 Nvidia V100s
- Peak: 1150 TFlops
Singularity
- Run most containers on MSI resources without sudo permission
module load singularity
Singularity can be used to run most Docker containers. You can create a container on an Ubuntu laptop, transfer it to MSI, and then execute it using Singularity on the CentOS7 compute nodes.
Note: you CAN NOT currently build singularity images on MSI login nodes
You can
- create images elsewhere
- download from trusted sources
- remote build your continaers using the singularity public servers (if you trust them)
blynch@ln0006 [~/] cat test.spec
Bootstrap: docker
From: ubuntu:xenial-20191108

%post
apt-get update
apt-get upgrade -y

blynch@ln0006 [~/] singularity build --remote mytest.img test.spec
Links
Batch Computing
- Create a batch script
- Submit script to a queue
- Scheduler runs script at some point on the reosurces requested
A PBS submission script has 2 components
- #PBS directives to tell the scheduler what resources you want
- a set of commands to run
An example script would look like:
#!/usr/bin/bash
#PBS -l nodes=1:ppn=24
#PBS -l walltime=5:00:00
#PBS -l mem=60gb
#PBS -e myjob.e
#PBS -o myjob.o
#PBS -q mesabi

module load python
source activate myenvironment
cd some/directory
python something.py
and can be submitted like:
qsub myscript.shJob Queues
Interactive computing
- Jupyter (https://notebooks.msi.umn.edu)
- qsub
From the command line:ssh login.msi.umn.edu ssh mesabi qsub -l nodes=1:ppn=2,mem=2gb,walltime=1:00:00 -q interactive -I
The interactive queue is more available than other queues, but you can always request resources for interactive use. E.g.;
qsub -l nodes=1:ppn=24,gpus=2,walltime=1:00:00 -q k40 -Ior
qsub -l nodes=1:ppn=24,gpus=2,walltime=1:00:00 -q v100 -I
Using Custom Kernels in Jupyter
- ssh into mesabi
- load python module
- create a new python environment
- customize environment
ssh login.msi.umn.edu
ssh mesabi

module load python
conda create -y --name myproject
source activate myproject
mkdir .local/share/jupyter/kernels/mynewkernel
vi .local/share/jupyter/kernels/mynewkernel/kernel.json{
"argv": [
"/home/support/blynch/.conda/envs/mynewkernel/bin/python",
"-m",
"ipykernel_launcher",
"-f",
"{connection_file}"
],
"display_name": "Python 3 - My Special Kernel",
"language": "python"
}customize your kernels
{
 "argv": [
  "/opt/singularity/singularity",
  "exec",
  "-B",
  "/panfs/roc/groups/2/support/blynch:/panfs/roc/groups/2/support/blynch",
  "/home/support/blynch/singularity/tf.simg",
  "/opt/anaconda3/bin/python",
  "-m",
  "ipykernel",
  "-f",
  "{connection_file}"
 ],
 "display_name": "Python 3.6 Singularity Tensorflow r1.12",
 "language": "python"
}import warnings
def fxn():
warnings.warn("deprecated", DeprecationWarning)
with warnings.catch_warnings():
warnings.simplefilter("ignore")
fxn()
from google.colab import drive
drive.mount('/content/gdrive')
- Tensorflow as started by Google, released in November 2015
- Written in C++
- Typically used from within Python directly or through the Keras module in Python

import tensorflow as tf
x = tf.Variable(3, name="x")
y = tf.Variable(7, name="y")
f = x*100 + y*3 - 7
print(f)
with tf.Session() as sess:
    x.initializer.run()
    y.initializer.run()
    result = f.eval()
print(result)
Keras
- developed as a high-level interface to create neural networks with Tensorflow and Theano.
- now it also supports Microsoft CNTK

import tensorflow as tf
mnist = tf.keras.datasets.mnist

(x_train, y_train),(x_test, y_test) = mnist.load_data()
x_train, x_test = x_train / 255.0, x_test / 255.0

model = tf.keras.models.Sequential([
  tf.keras.layers.Flatten(input_shape=(28, 28)),
  tf.keras.layers.Dense(128, activation='relu'),
  tf.keras.layers.Dropout(0.2),
  tf.keras.layers.Dense(10, activation='softmax')
])

model.compile(optimizer='adam',
              loss='sparse_categorical_crossentropy',
              metrics=['accuracy'])

model.fit(x_train, y_train, epochs=5)
model.evaluate(x_test, y_test)
model.summary()
from keras.callbacks import ModelCheckpoint

!mkdir /content/scratch
output_basename   = 'blynch-job1.hdf5'
output_model_name = '/content/scratch/' + output_basename

checkpointer = ModelCheckpoint(output_model_name, monitor='val_loss', verbose=1, mode='auto')

model.fit(x_train, y_train, epochs=5, callbacks=[checkpointer])

!ls -l /content/scratch


#model = load_model(input_model_name)
# copy a trained model to somewhere more permanent

!cp /content/scratch/blynch-job1.hdf5 '/content/gdrive/My Drive/Tensorflow'
TensorBoard
- Tensorboard is a tool to vizualize TensorFlow graphs and output.
- TensorFlow can output metrics to track the optimization process for a model
tensorboard_callback = keras.callbacks.TensorBoard(log_dir=logdir)
Stacking layers
Instea of defining the entire model in 1 line, we can add layers like this:
from keras.models import Sequential
from keras.layers import Dense
model = Sequential()
Then we can add layers
model.add(Dense(units=64, activation='relu', input_dim=100))
model.add(Dense(units=10, activation='softmax'))
and then compile the model with a loss function and optimizer
model.compile(loss='categorical_crossentropy',
              optimizer='sgd',
              metrics=['accuracy'])
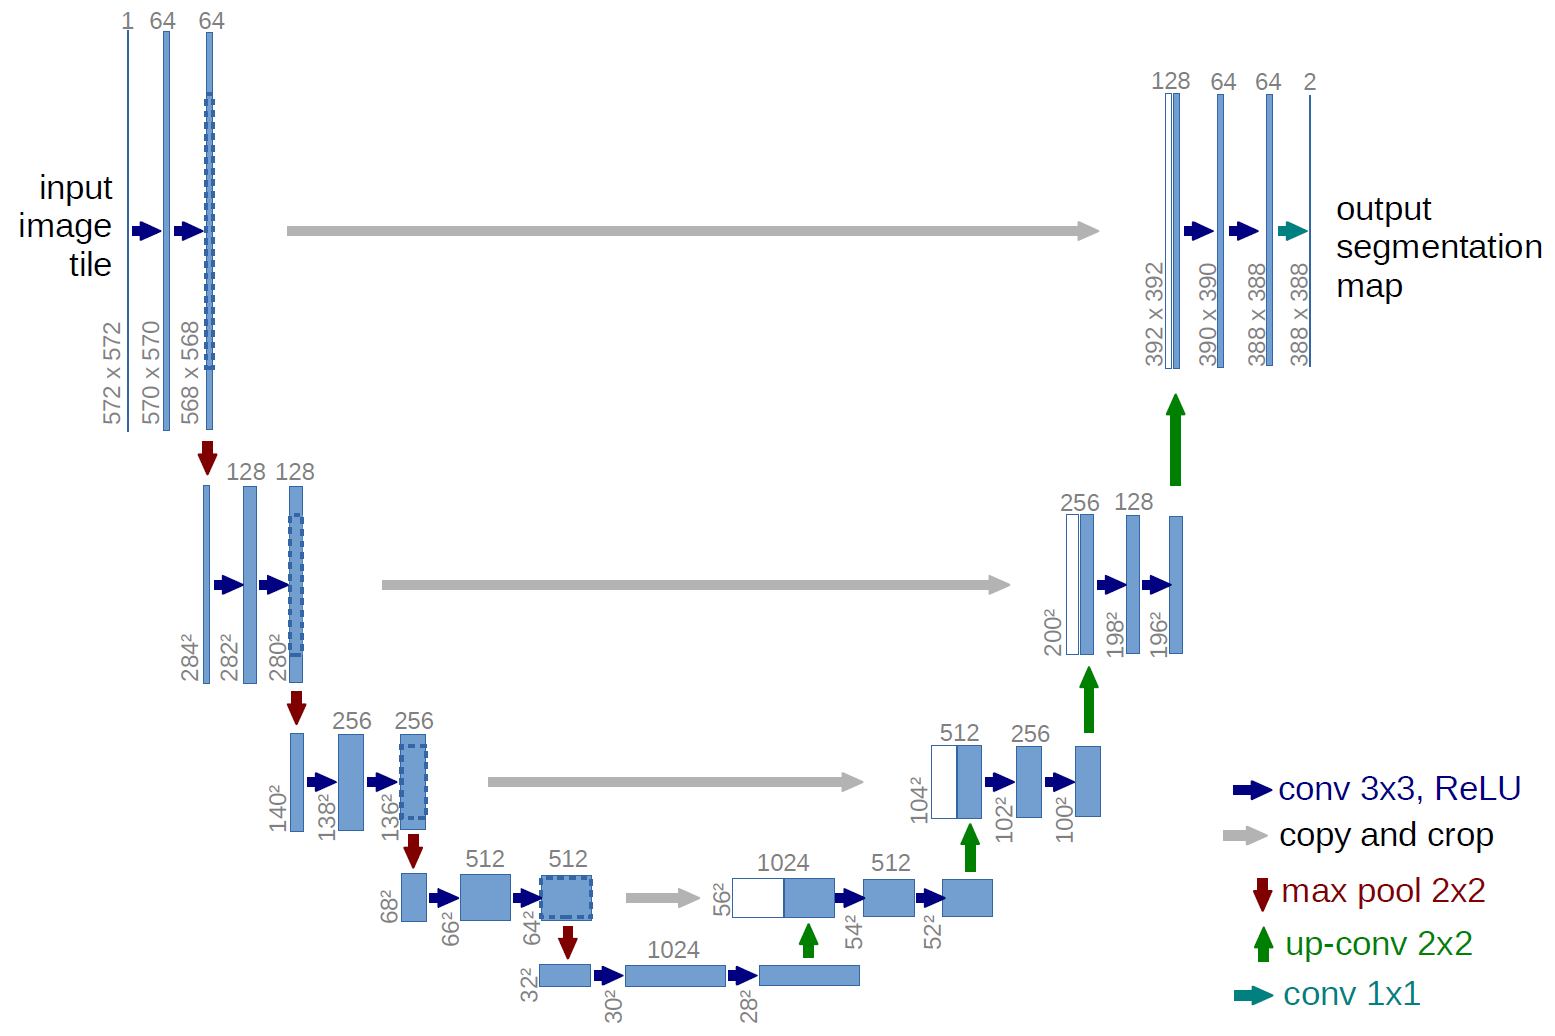
  inputs = Input((IMG_WIDTH,IMG_WIDTH, 1))

  layers = [0] * (U_DEPTH*4+2)
  crops  = [0] *  U_DEPTH
  layers[0] = Lambda(lambda x: x / 255) (inputs)

  for i in range(U_DEPTH):
      features = MIN_FEATURES*2**i
      layers[2*i+1] = Conv2D(features, (3, 3), activation='elu', kernel_initializer='he_normal', padding=padding) (layers[2*i])
      layers[2*i+1] = Conv2D(features, (3, 3), activation='elu', kernel_initializer='he_normal', padding=padding) (layers[2*i+1])
      layers[2*i+2] = MaxPooling2D((2, 2)) (layers[2*i+1])
  features = MIN_FEATURES*2**U_DEPTH
  layers[U_DEPTH*2+1] = Conv2D(features, (3, 3), activation='elu', kernel_initializer='he_normal', padding=padding) (layers[U_DEPTH*2])
  layers[U_DEPTH*2+1] = Conv2D(features, (3, 3), activation='elu', kernel_initializer='he_normal', padding=padding) (layers[U_DEPTH*2+1])

  for i in range(U_DEPTH):
      edge = 2**(i+2) + 2**(i+3) - 2**3
      features = MIN_FEATURES*2**(U_DEPTH-i-1)
      crops[i] = Cropping2D((edge, edge))(layers[U_DEPTH*2-1-2*i])
      layers[U_DEPTH*2+2+i*2] = Conv2DTranspose(features, (2, 2), strides=(2, 2), padding=padding) (layers[U_DEPTH*2+1+i*2])
      layers[U_DEPTH*2+2+i*2] = concatenate([layers[U_DEPTH*2+2+i*2], crops[i]], axis=3)
      layers[U_DEPTH*2+3+i*2] = Conv2D(features, (3, 3), activation='elu', kernel_initializer='he_normal', padding=padding) (layers[U_DEPTH*2+2+i*2])
      layers[U_DEPTH*2+3+i*2] = Conv2D(features, (3, 3), activation='elu', kernel_initializer='he_normal', padding=padding) (layers[U_DEPTH*2+3+i*2])

  outputs = Conv2D(1, (1, 1), activation='sigmoid') (layers[U_DEPTH*4+1])
  model = Model(inputs=[inputs], outputs=[outputs])
PyTorch
import torch

# N is batch size; D_in is input dimension;
# H is hidden dimension; D_out is output dimension.
N, D_in, H, D_out = 64, 1000, 100, 10

# Create random Tensors to hold inputs and outputs
x = torch.randn(N, D_in)
y = torch.randn(N, D_out)

# Use the nn package to define our model as a sequence of layers. nn.Sequential
# is a Module which contains other Modules, and applies them in sequence to
# produce its output. Each Linear Module computes output from input using a
# linear function, and holds internal Tensors for its weight and bias.
model = torch.nn.Sequential(
    torch.nn.Linear(D_in, H),
    torch.nn.ReLU(),
    torch.nn.Linear(H, D_out),
)

# The nn package also contains definitions of popular loss functions; in this
# case we will use Mean Squared Error (MSE) as our loss function.
loss_fn = torch.nn.MSELoss(reduction='sum')

learning_rate = 1e-4
for t in range(500):
    # Forward pass: compute predicted y by passing x to the model. Module objects
    # override the __call__ operator so you can call them like functions. When
    # doing so you pass a Tensor of input data to the Module and it produces
    # a Tensor of output data.
    y_pred = model(x)

    # Compute and print loss. We pass Tensors containing the predicted and true
    # values of y, and the loss function returns a Tensor containing the
    # loss.
    loss = loss_fn(y_pred, y)
    if t % 100 == 99:
        print(t, loss.item())

    # Zero the gradients before running the backward pass.
    model.zero_grad()

    # Backward pass: compute gradient of the loss with respect to all the learnable
    # parameters of the model. Internally, the parameters of each Module are stored
    # in Tensors with requires_grad=True, so this call will compute gradients for
    # all learnable parameters in the model.
    loss.backward()

    # Update the weights using gradient descent. Each parameter is a Tensor, so
    # we can access its gradients like we did before.
    with torch.no_grad():
        for param in model.parameters():
            param -= learning_rate * param.grad
Using GPUs and Parallel Training
Tensorflow
When using a GPU-enabled version of Tensorflow on hardware with GPUs, TensorFlow will try to make use of the hardware. This is a good place to start until you have a very thorough understanding of your problem. After that, you can look into:
tf.distribute.Strategy - use multiple GPUs
tf.distribute.Strategy - use multiple NODEs
Pytorch
DataParallel - multiple GPUs torch.distributed - multiple nodes
Horovod
Another framework for running Tensorflow or Pytorch over multiple nodes.
 cp -r /home/dhp/public/deep_learning/horovad/use_8_gpus .
 cd use_8_gpus
 qsub pbs_run